Perfect for photographing flies you've tied!


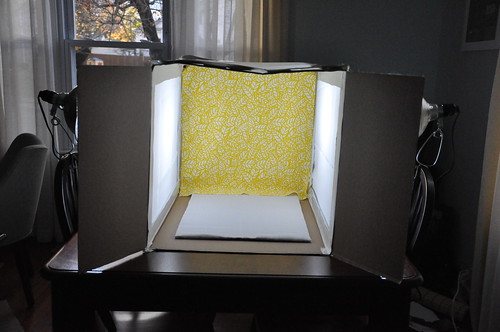
As I mentioned yesterday, Stephen and I built a light box (mini-studio) over the weekend. We're hoping it allows us to take better photos in the dark hours (which are now abundant). Plus, it's just fun to play around -- we're relatively new to serious photography.
The benefit of building your own light box is that . . . you no longer need the sun to take an adequate photo. By carefully positioning three lights (with daylight bulbs -- producing a nice, cool tone) and bouncing light off fabric, you can eliminate many shadows from your shots. I get a lot of rejections from Tastespotting and Foodgawker for lighting/shadows. It makes me sad.
Uh -- hello! I work full-time. So, most of my photography has been done at weird lighting hours. I know many of you are in the same dismal situation.
Anyway, though I enjoy this light box, it doesn't substitute for natural light. But it helps. And I think after a couple weeks with it, I'll have more tips on how to get the best photos possible. At least I hope!

You'll need . . .
- A cardboard box (larger than 12" x 12" -- mine's 18")
- Duct Tape (we used both the silver and white)
- White tissue paper or fabric (we used a cloth shower curtain liner)
- Velcro (optional, we'll explain below)
- Daylight bulbs -- 100 watt
- Box cutter
- 3 cheap-o utility lamps w/ clamp bottoms (as shown -- we bought the medium size)
- Fabric or paper background/backdrop (we'll explain below)
- 3-outlet extension cord (optional)


Total cost: Approx $35 (but you can do it for less than $20 -- we overspent)

STEP 2: PREPARE YOUR BOX
Take your cardboard box and tape the back of it so it's closed on one end. Then, you're going to take your box cutter and cut out windows from three sides of the box (the right, left, and top). Leave the bottom as-is.

We left about 2 inches of a border for support. If that makes any sense. (For a lot of these instructions, it's just easier to look at our light box. Kind of hard to explain).

Have fun with the box. This process takes at least an hour (or two), so you need to do something to make yourself laugh a bit.

We also framed ours out with duct-tape. I don't think this step is necessary. We thought it would provide extra support . . . but it didn't make much of a difference.
Seriously! Don't waste your time!

STEP 3: TAPE ON YOUR TISSUE PAPER OR FABRIC
Cut panels of white cloth/tissue paper that will cover each of your open windows you cut out. We got fancy and started to velcro each panel on. This was so totally not worth it. Simply tape your white material over each of your open windows.
It's that easy.

We used a polyester bath curtain liner for this part. We thought it would be the best material for bouncing light. Maybe. Maybe not. It was annoying to have to iron it before putting it on the box. I've read many different places that white tissue paper works just fine.
Plus, tissue paper costs mere pennies. The liner was $10.
STEP 4: HANG A BACKDROP, LAY A "FLOOR"
I used some Velcro (prickly side) on the very back on the box . . . and then put a line of Velcro (soft side) on several different swatches of fabric (that are as wide as the box and at least as long as the box). Too, I laid a bamboo table runner on the bottom of the box to create an interesting floor for my shots. You can also just lay more white fabric . . . or use a long piece of fabric and drape it from your Velcro anchor coming toward you.
Admittedly, mine looks a bit sloppy. But you don't need it to be perfect because you'll frame out all the bad stuff in your photos.

STEP 5: LIGHTS, CAMERA, ACTION!
You'll want one of your lights (I believe ours are 8" in diameter) shining through each of your windows. The white fabric diffuses the light, making it soft and perfect for taking bright photos with little shadow.


We still haven't found a permanent space for our light box, so we clamped our lights onto chairs. ANYTHING we could find to get them zeroed in on the right spot.
STEP 6: TAKE LOTS OF PHOTOS. EXPERIMENT AND HAVE FUN!
Here are some of the first shots I took:


SOURCES:
If you're wondering where I learned to build this thing . . . I seriously consulted just about EVERY single page I could find. Just Google (or even search in YouTube) "how to build a cheap light box" or "photography light box DIY" or something similar. There are all different methods. Find what's right for you and your budget.
And if you'd like to just have one magically appear, you can order them. I've seen prices starting at $59 . . . all the way up to $1,200.
Whatever the case may be, it's a whole lot better than my other solution:

Questions? Comments? Suggestions? They'd love to hear 'em. Just leave (never home) maker a note below or email them at neverhomemaker [at] gmail [dot] com.
Boom...Morgan
No comments:
Post a Comment